floor planns

link:https://princetonlibrary.org/event/3d-modeling-with-sketchup/
Deadline is coming, hence I was made to create the floor plans. At the first tutorial in week four, I concerted with my tutor to design three floor plans respectively to each level of the building designed by me. My tutor recommended me to use digital software, as I may have found as more comfortable. Thus, I made a comeback to SketchUp. I work with this softwere during the last term. I consider this software as easy in navigating and in making basic shape. As more a construction is as harder is to creating at his software. However, a floor plan is simple geometrical, so I did not see any reason to not use it. Especially, I had experience from the previous term. I had already usen free trial, so I must have tried with the online version, which is kinda different (in other words; is more primary).


I made the willing shape, however, it turned to be not on the same layer. In last term I made a terrible mistake, I took screenshots of my project when the view was not perpendicular. Aa the result, I got a floor plan which was at an angle (even if I edited it in Photoshop, it still looked badly). Therefore, Firstly what I did was making sure that my view is birdseye. I change it by left-clicking on View Button and choosing the option 'viewBottom'.

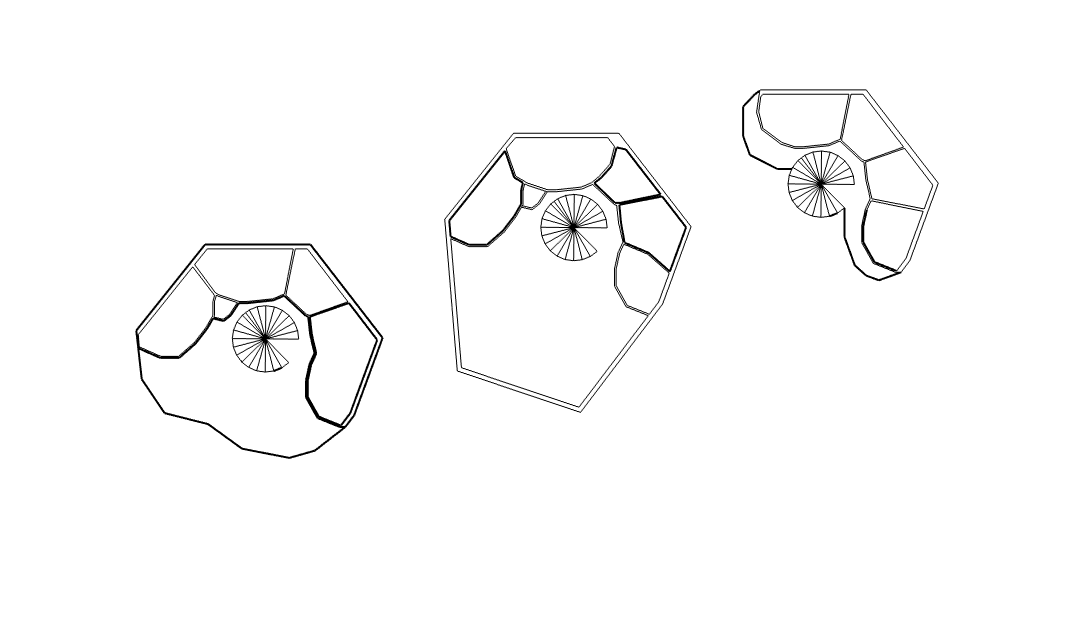
Before I started adding the rooms into my building I had coloured it into white, by choosing Paint Tool and the colour from the right bar. Thereafter, I used an Offset Tool, thanks to it I made sense of walls. Than I again used a Line Tool adding a room. I make a really small lines, because I wanted to created more curve effect. Owing to this my building seems to be more intesting.

Not all walls of rooms could be done with an Offset Tolls, three of them I was pressured to draw with a Line Tool. As the results the lines have different thickness and I was not able to coloured it in other colour than white. This of course drawbacks, so I am going to edit it in Illustrator, if I only find time.

Thereafter, I added a steps on in the circle, because even if is not real scale, I wanted to mark that are stairs, not another room or a column. Even I deeply thought, how to highlight a doors, I will add it in Photoshop during making a board.

When my first plan was ready, I right-clicked on one wall and choose the option 'Select on the same layer'. I coped it and pasted next to. Thanks to this I had already had a done shape and only some parts need to be refixed or delighted.

I changed a layout of room a little, but only a little. I used a Line Tool and a Offset Tool again .


Below you can view my floor plans. Respectively: second floor, first floor and third floor.
Me before deadline:

link:https://www.ilikesticker.com/LineStickerAnimation/S003630-UNIVERSTAR-BT21-Cosmic-Chemistry-Part-1/en
Comments
Post a Comment